Tuesday, January 21, 2014

Which is the best browser for your iPad?

Opera


Opera's mobile browser comes in two flavours: Android users get the full Opera Mobile, while i05 and BlackBerry owners get the slightly less feature-packed Opera Mini. Whichever you choose, you get a clean and friendly interface, with a one-touch sharing feature for sending URLs to friends, and a convenient Save Page tool that grabs copies of pages for you to read offline. The Android edition also features a convenient integrated download manager; which lets you pause, resume and rename downloads within the browser.

What really sets Opera apart is its "off-road" mode, available on both platforms. This lets you route your browsing through a proxy server that automatically compresses every web page you visit. The result is that pages load faster, and your mobile data usage can be slashed by as much as 90%. Plenty of browsers premise to Salle you time but switching to Opera could actually save you real money.

Chrome


Once you've signed in to Google's ecosystem. Chrome seamlessly picks up your bookmarks, passwords and history from your desktop browser, giving you a similar experience across any device you log in to. It supports unlimited tabs on even the smallest screens, and its Incognito mode" lets you browse without leaving a trace. You can also send pages from your PC to your phone or tablet with a single click, which is handy for sending yourself directions.


Maxthon Cloud Browser


Windows Phone isn't blessed with a huge range of browsers, but Maxthon beats TE hands down, For one, you can switch between tabs with simple swipe gestures, and you can jump to your favourite sites using a Live Tile-inspired Quick Access page. Best of all, if you use Max-thon's browser on the desktop. your bookmarks and other data are automati¬cally synced, just like with Chrome.

Monday, January 20, 2014

TV & Movie Guide Australia: free app for your iPad

This was always going to be a tough section to fill.

Thanks to the lack of access to the many great streaming services enjoyed in other regions around the world, were a little restricted when it comes to great streaming apps. In fact, were very restricted! Many of the big national networks have their awn apps and channels, but there's no one service that leaps out.

So were going with something that at least helps you across all channels - a good TV guide!

Even then, its tough finding one that works on a number of devices. However, we've picked eBroadcast's excellent TV & Movie Guide Australia for a couple of reasons.

Sure, ifs restriced to Android (use OzTV if you are an Apple fan), but not only do you get an excellent TV guide, with the ability to share television picks with friends., choose what channels you want to track from every station in Australia, but you can also keep across cinema times, too!

You can find session times for all cinemas in the country, keep up to date with new releases and mane previews, and get access to iMDB and official movie websites.

Not bad for a free app!

Sunday, January 19, 2014

Strava: awesome app for your iPad and iPhone.

Strava is the king of cycling apps. It can take any ride and turn it into a competition - brilliantly. It's so effective at making league tables out of the most innocuous routes that, according to the media, we're now a nation overrun by antisocial racers, risking lives to trim records, apparently.

For most sane people, how ever, Strava is simply a great incentive to get back on the bike every day_ Rides am tracked and stored, complete with detailed breakdowns.

The real fun conies in the challenging element - whether in beating your own persona] bests or those of others in your area. You don't even have to match someone's entire ride to join in; just complete one of the thousands of short segments programmed in Strava's database. Some of the more popular routes attract riders from far and wide for a crack at topping the leaderboard - riot all in the countryside, which is what gives Sirava its slightly controversial reputation.

Strava is also available in a running version.

Wednesday, July 10, 2013

The best way to successfully restore data from iOS devices

Freaking out cause youaccidently erased photos, sms messages or another important stuff on your iPhone, iPad or iPod touch? iPhone is broken or damaged and after this the data’s gone? Unsuccessful updates kill your data? All these problems could be solved if you have owned a Wondershare Dr.Fone for iOS.

Wondershare Dr.Fone for iOS is a fantastic tool for iOS devices users to get better data just like photos & videos, contacts, SMS, call logs, memos plus more! It includes the two of you sorts of recovery mode: to get better data right from the iOS device and to retrieve previous data by extracting it from iTunes backup! On this page, we're going to primarily present you ways to retrieve lost data right from iOS devices.

Find Promotional code for Wondershare Dr.Fone for iOS.

Part 1: Right retrieve from iPhone 5/4S, iPad mini, iPad with Retina display, The new iPad, iPad 2 & iPod touch 5

Step1. Connect your device to the computer

Run it on your laptop or computer, and connect your device (eg. iPhone 5). Then you’ll start to see the window underneath.

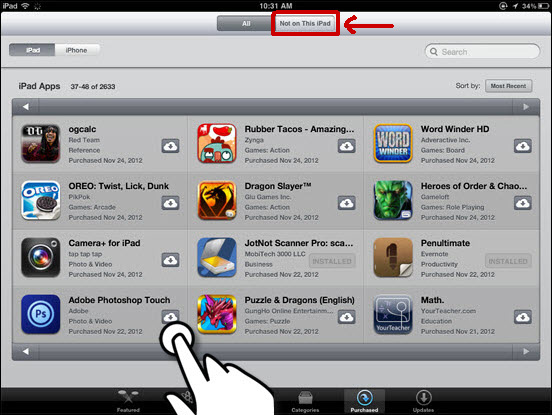
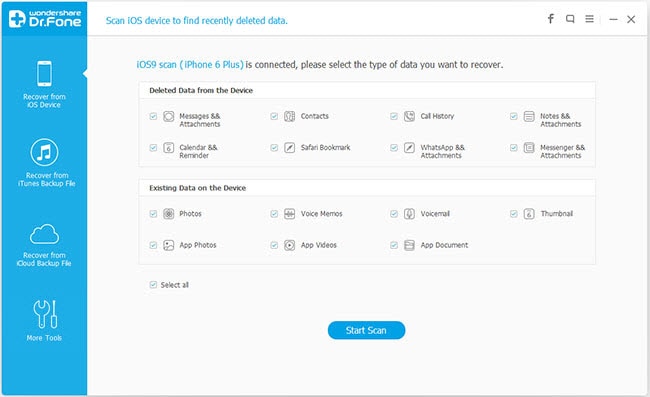
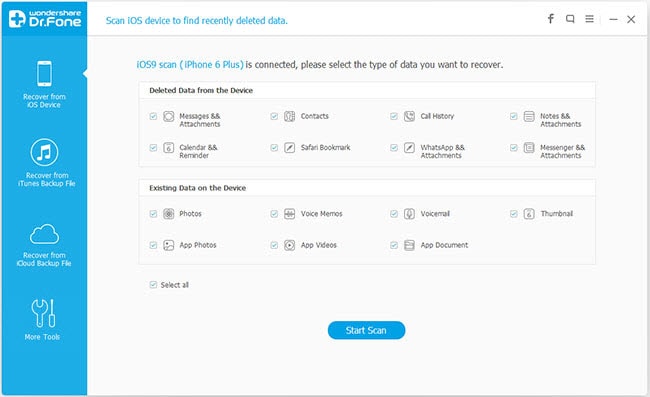
Step2. Will scan your device for deleted data on it

If your device is organized by the software, just click “Start” to start with scanning it.


Step3. Preview and recover your data selectively

Following the scan, you are able to preview all data found on your device in the scan result. Go through the categories on the left side of the window like camera roll, contacts, messages, etc. You are able to preview all the information of them (except for videos). Mark what you look for and click on “Recover” to save them on your computer with single click.

Part 2: Recover Data Completely from iPhone 4/3GS, iPad 1 & iPod touch 4

Step1. Connect your device to the computer

Run the application on your laptop or computer, and connect your device (e.g. apple iphone 4). After that you’ll view the window underneath.


Step2. Download a plug-in to your device before scanning it

For the unit, you'll want to download a plug-in prior to deciding to scan them. It’s very easy. You only need to click the “Download” option on the window, and it will get you 1-2 minutes.


Step3. Enter in the device’s scanning mode and scan it

Following downloading the plug-in, you can enter the device’s scanning mode now. Adhere to the steps below.

1. Hold your device and click on “Start” on the window of the software.

2. Hold the"Power"and"Home"buttons on your device simultaneously for just 10 seconds.

3. As soon as 10 seconds have passed, release the"Power"button right away, but maintain holding the"Home"button for another 15 seconds.

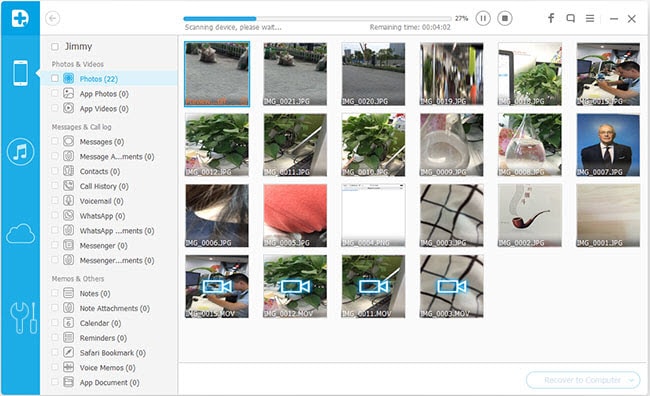
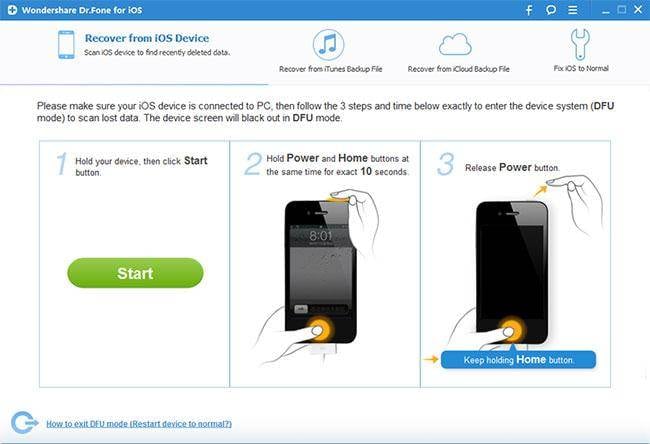
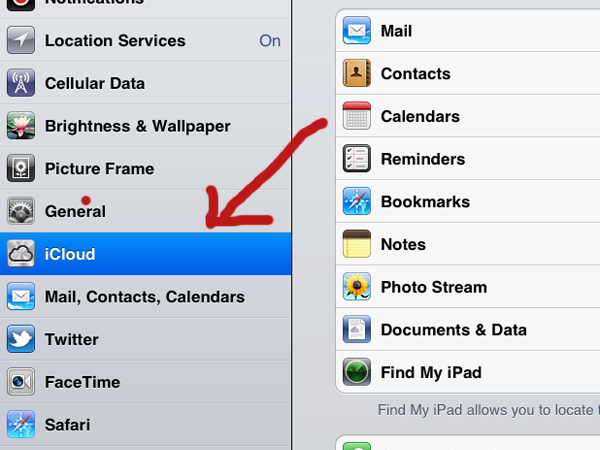
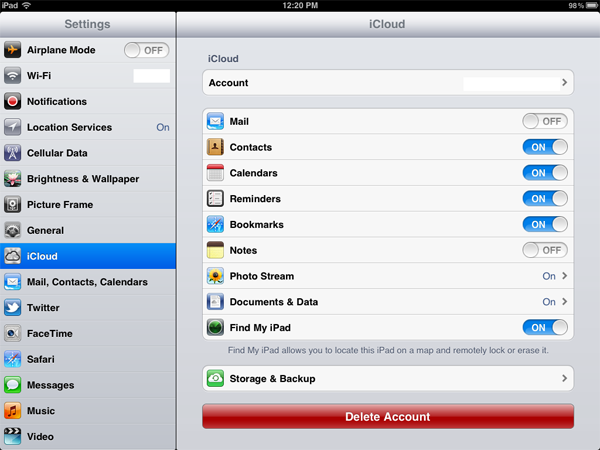
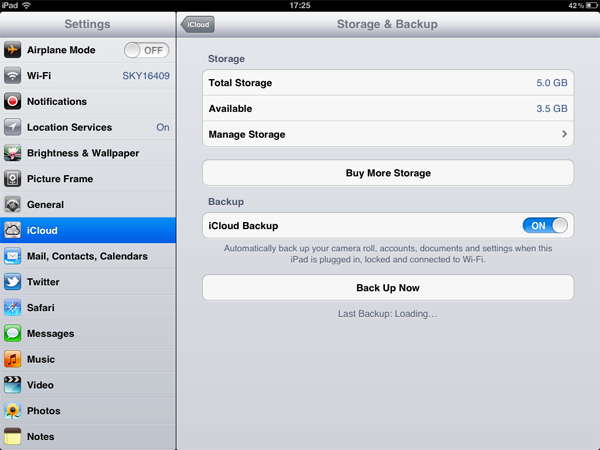
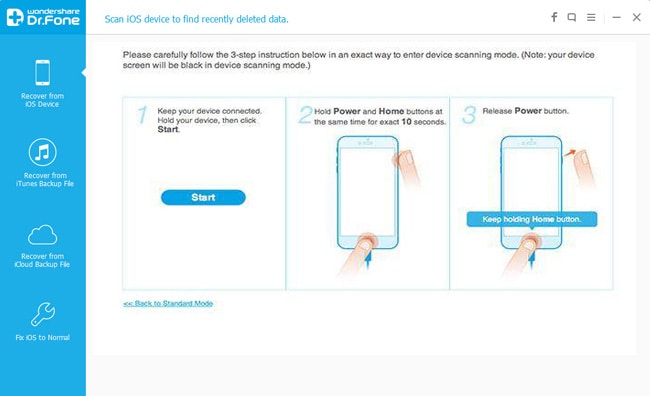
When you’re informed that you’ve successfully entered the device’s scanning mode, Wondershaer Dr.Fone for iOS may automatically begin scanning your device for data on it these.

Step4. Preview and recover your data precisely

After the scan, it is possible to preview all data located on your device in the scan result. Press the categories on the left side of the window for instance camera roll, contacts, messages, and so on. You can preview all the specifics of them (except for videos). Mark what you would like and click on “Recover” to save them on your computer with a single click.

 
Note: The data displayed in the scan result consists of deleted and existing items on your device. Each of them have their own color. If you need to separate them, you should use the button on the top:"Only display the deleted items.

Now, use Wondershare Dr.Fone for iOS coupon code: EASY-8TBN-GCHT on moyeamedia.com, you will get discount with 45% off.

Tuesday, March 5, 2013

Using iCloud to restore app downloads

Thanks to iCloud you can now access every single app you have downloaded, whether free or paid-for, with ease and without the need to pay for it again.

STEP 1
Open the App Store application and tap the Purchased link in the bottom menu bar.

STEP 2
You can now access all your app downloads since you set up your Apple ID.

STEP 3
From this screen, tap the "Not On This iPad" link at the top of the page to access iCloud and the downloads contained within.

STEP 4
Having selected the app you wish to download simply click the iCloud icon beside the app and it will instantly start to install.

Monday, March 4, 2013

Customising iCloud

iCloud is a huge leap both in terms of data storage and how you manage the content on your iDevice. iCloud links to a large array of iPad applications and although all of these links will prove exceptionally useful you may want to only use the applications that will directly benefit. For this guide we will take you through each stage of optimising your iCloud usage.

STEP 1
From the home screen select the Settings option and scroll down to iCloud link and tap it.


STEP 2
On this page you can choose which content you wish to share over Cloud. Mail, Contacts, Calendars, Reminders, Safari Bookmarks and Notes are rather straightforward. By checking the slider to the "On" position, all new content to sent to or generated by these apps will be automatically uploaded to iCloud during sync.


STEP 3
The Photo stream option is a little different as all images taken or downloaded via your iDevice will be uploaded to the iCloud as usual but these images will be also be shared over all other iCloud linked devices on your network. This may cause problems due to the size of your images and the memory capacity of your other devices.

STEP 4
By choosing to share through the Documents & Data option all documents generated via your device or a host of applications will be uploaded to iCloud. This is very useful but we suggest you maintain a close eye on your iCloud data storage levels. From this link you can also choose to upload data via mobile data transfer. We advise you to checkyour data package with the network provider before selecting this link.

STEP 5
The Storage & Backup link at the bottom of this page offers you access to your iCloud account to purchase more storage space and check current volume levels.

STEP 6
Also on this screen you can choose to use the iCloud Backup option which enables you to sync directly with iCloud without needing to connect your iDevice to the charger. By selecting this option you can automatically back ups all new data in real time when the device is connected to your Wi-Fi network.


Sunday, March 3, 2013

Your Guide to iCloud

iCloud has changed the way we store everything on our Apple devices. From photographs, music and videos to simple notes, if it's important then it can be saved to you’re your iDevice and your iCloud account. Now if the worst was to happen and you lose your iPad your data is safe and can be easily and securely restored within moments.

Signing up for iCloud - step-by-step

Linking your iDevice to iCloud is extremely easy. Having initially set up your device via iTunes, or via your Wi-Fi connection using the PC Free set-up option, you will have reached the iCloud link screen. If you linked to iCloud at this point during set up please skip to "Customising iCloud" feature below. If you didn't then carry on and we will take you though this process from start to end.

STEP 1
From the Settings app on your home screen, scroll down the options until you find the iCloud link, then tap it to move on.

STEP 2
On this screen you will have to enter your Apple ID details, or if you are a first time user you can sign up for an account via the "Get A Free Apple ID" link at the bottom of the screen.


STEP 3
Once you have completed the registration and/or signed in, you will receive the following request asking you if want to merge your account with iCloud. Assuming you want to go ahead, click the "Merge" link.

STEP 4
You will now receive a second request.This simply asks to confirm the use of your locational service on your device. Make your selection to proceed. A positive reply is not necessary but is suggested.


STEP 5
From this page you can choose which file types and apps you wish to link to your iCloud account. Do bear in mind that there is a five gigabyte size limit placed upon your account. Additional space is available for an extra cost.


STEP 6
Scroll down to the bottom of the page and click the Storage and Backup link. Here you can check your storage volumes and choose to activate the iCloud Backup option. This way any time you plug your iPad in to charge, as long as it is connected to a Wi-Fi account it will automatically back up any new content to your iCloud account; it doesn't even need to be activated. If you wish to use this extremely useful ability slide the switch to the on position and agree to bypass iTunes back-up. You are now connected to iCloud.